Harvested rainwater provides ample free water for your garden, yard, or for filling water features or garden ponds. By not using municipally treated potable water for the garden, you save money and help the environment. A DIY rain barrel is simple to build and takes just an hour or two.
Before You Begin
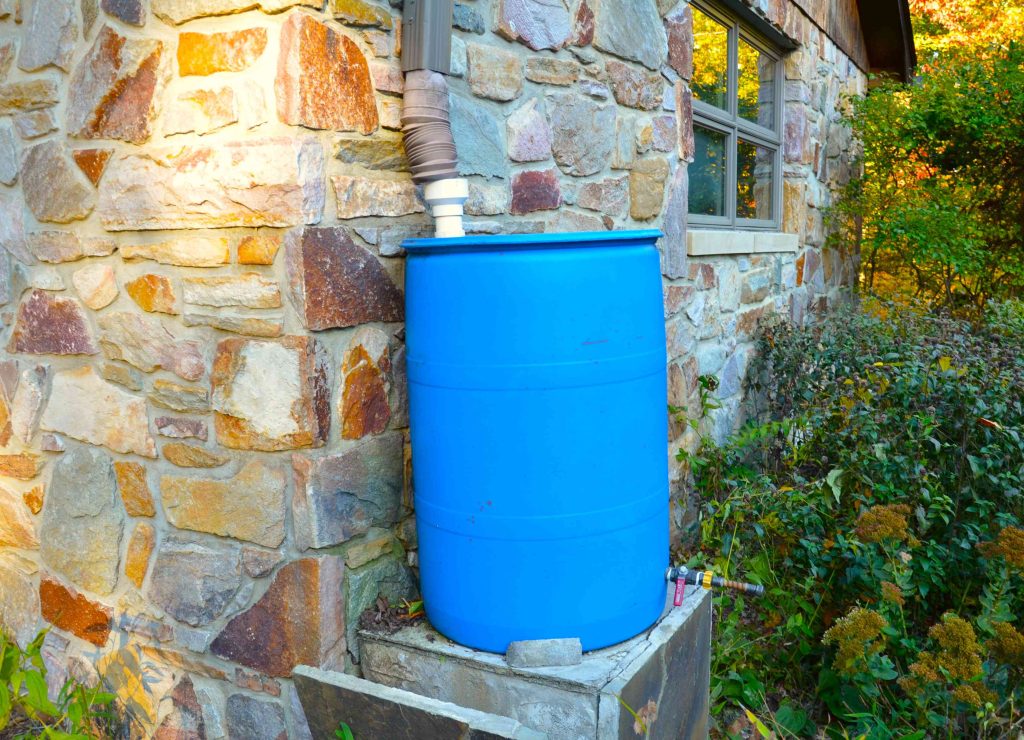
Your house already has a ready-made rainwater collection system: roof, gutters, and downspouts. The key is to divert that water into your own DIY rain barrel. For that, two important items are a plastic barrel and an in-line downspout diverter.
Barrel
New 55-gallon plastic barrels are available for around $130 to $160. One benefit of buying a new barrel is you’re guaranteed that it has not previously contained materials.
Free or low-cost used plastic barrels available locally may be advertised on Craigslist, Facebook, or other online listings. Places that use and discard plastic barrels may give you a barrel if you contact them directly. Car washes, soda manufacturers, commercial beer brewers, winemakers, or homebrewers use plastic barrels.
In-Line Downspout Diverter
An in-line downspout diverter is a plastic or metal device that replaces part of a home’s downspout. A section of the diverter is capable of directing water from the downspout into a rain barrel instead of onto the ground.
Some diverters send all of the water into the barrel. Others have an internal catch designed to send 30- to 40-percent of the water into the rain barrel, with the rest continuing through the downspout.
Whichever diverter you buy, all will have some type of shut-off so that water diverted to the barrel can be turned on or off as needed.
Safety Considerations
Verify the previous contents of the barrel before using it. Look for either new or food-grade barrels. Do not use barrels that contained hazardous materials that may be harmful to the garden.
Because a full 55-gallon rain barrel weighs 450 pounds, create a solid, level, flat base for the rain barrel so it does not tip over.
What You’ll Need
Equipment / Tools
- Cordless drill
- Adjustable wrench
- Hacksaw
- Hole saw, 1-1/4-inch diameter
- Utility knife
- Shovel
- Bubble level
- Indelible marker
Materials
- 55-gallon plastic barrel
- Inline downspout rainwater diverter (2×3 or size-appropriate)
- Brass water container spigot
- Plumber’s tape
- 4 bags of sand
- 2 concrete pavers to cover 24-inch by 24-inch area
- 2 retaining walls blocks (CMUs)
- 3/4-inch exterior plywood
Instructions
-
Locate a Downspout for the Rain Barrel
Choose a downspout within 2 or 3 feet of the rain barrel location. Typically, this will be on the side of the house or the backyard. It’s helpful if the barrel is located near the plants that you will be watering. More importantly, though, the downspout should be able to produce water. Test this by running a hose onto the roof or by observing during the next rain.
-
Build a Solid Base for the Barrel
A properly built concrete patio or concrete slab can serve as a rain barrel base. If grass, use the shovel to remove the turf. Dig down 4 inches and remove the dirt. Fill with sand, then top with the concrete pavers.
-
Create a Platform for the Barrel
Place at least two (depending on their size) retaining wall blocks or concrete masonry units (CMUs) on the pavers to create a stable base. Add plywood to the top as a platform and level it out with the bubble level.
-
Mark a Diverter Location on the Downspout
Find a location on the downspout at least 24 inches higher than the top of the rain barrel. Mark this with the indelible marker.
-
Cut the Downspout
Use the hacksaw to cut out the appropriate amount of downspout and remove the cut portion.
-
Slide the Diverter Onto the Downspout
Slide the inline diverter onto both the top and bottom portions of the downspout.
-
Drill a Hole in the Barrel
Place the barrel on the platform. Remove the lid. On the side of the barrel, mark a spot 2 inches up from the bottom. With the hole saw fitted onto the cordless drill, drill a 1-1/4-inch hole (or needed size) on the side of the barrel. Clean up the shredded edges of the hole with the utility knife.
-
Fit the Spigot to the Barrel
First place the rubber gasket on the spigot, then slide the spigot into the hole on the barrel. For the inside portion, tip the barrel to the side and slide the second gasket onto the spigot. Next, turn the brass nut onto the threads. Tighten the nut. Make sure that the spigot (on the outside) remains pointed down.
-
Attach the Hose From the Diverter to the Rain Barrel
Replace the barrel lid. Attach the hose included with the diverter kit from the diverter to the top of the rain barrel.
-
Test the Rain Barrel
Spray water onto the roof to test the rain barrel. Make sure that the gutters are clean before using the system.
When to Call a Professional
Rain barrels larger than 55 gallons or multiple-barrel collection systems can be installed by a qualified landscaping contractor.
Read the full article here


