Squeaky stairs are annoying and make a house feel old and dated. The good news is that most stair squeaks can be traced and fixed.
Find out what’s making your stairs squeak, and learn how to fix squeaky stairs in a few steps.
How Stairs Are Made
Before fixing squeaky stairs, it’s essential to understand the three major components and what they do:
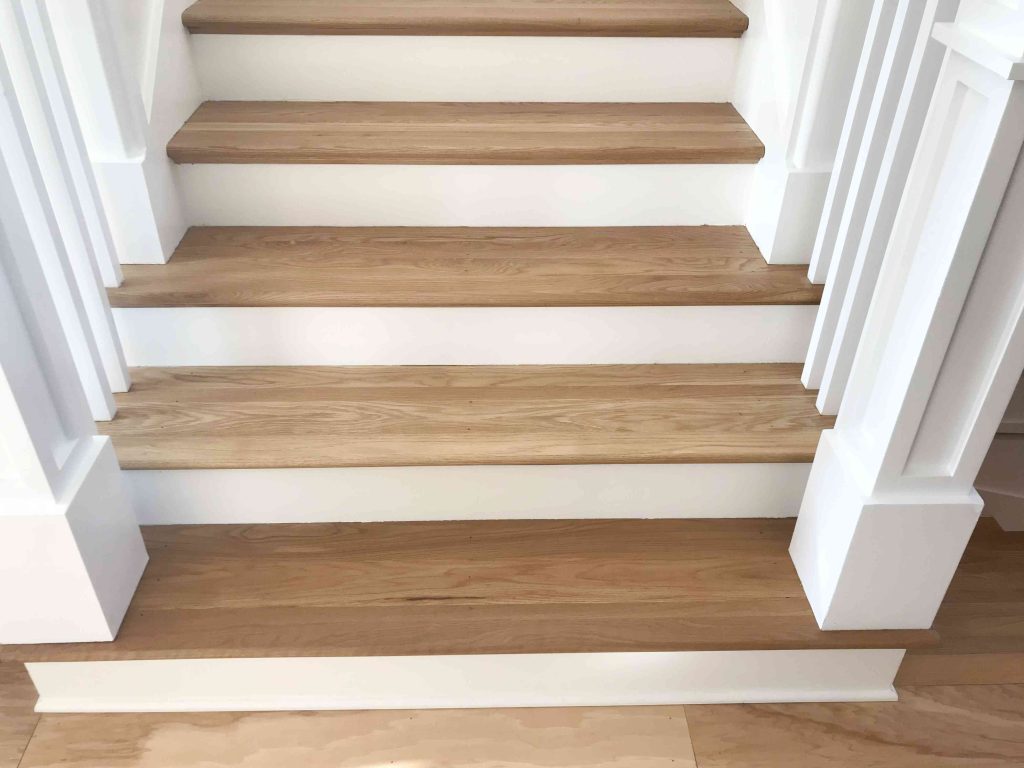
- Steps: Steps are the horizontal treads that you step on.
- Risers: Risers are the vertical boards between steps. Stair risers prevent your foot from falling through and give the stairs a finished look.
- Stringers: Stringers are the lengthwise, saw-shaped boards below the steps and risers. Staircases always have two stringers, though sometimes there is an additional stringer.
Want more home reno project tips and inspiration? Sign up for our free daily newsletter for the latest how-tos, reno guides, and more!
Why Stairs Squeak
Stairs squeak mostly because the step rubs against the riser or nails rub against the step. Sometimes, one of the stringers rubs against a wall, but this is less common.
Step Rubs Against Riser
When weight is placed on a stair step, the back of the step rubs against the front of the riser, causing a squeak.
The fix is to fasten the step to the riser, preferably from the bottom of the staircase.
Nails Rub Against Step
The nails holding the step to the stringer are ordinarily solid and fixed in place. But over time, the nails may loosen. When the step flexes, the nail rubs against the nail hole.
Fix this problem from the back by nailing the riser to the back of the step or adding brackets to support the step.
Stringer Rubs Against Wall
When the staircase is attached to a wall on one side, the stringer may rub against the wall as a person walks on the stairs. This stringer ordinarily is nailed or screwed into the wall’s two-by-four studs.
If the nails or screws are detached (or were never there in the first place), the stringer will bounce. The fix is to re-nail or screw the stringer to the wall studs.
How to Identify the Source of the Squeak
It’s usually easy to find the source of the squeak.
- Walk the stairs: Slowly walk up and down the stairs. Remain close to the center of the stairs since this is where most squeaks happen.
- Mark the squeaky stairs: When you step on a squeaky stair, drop an item on it so you’ll remember it later.
- Look underneath: With a flashlight, watch the underside of the stairs as a person walks up and down. You may see stair steps flexing under the person’s weight.
Stair Squeaks in New vs. Old Homes
The age of the home often determines the type of materials used for the stairs and their current condition.
New Homes
Newly built homes require time for the building materials to acclimate to the home’s average temperature and humidity levels. Wait two or three months after moving into the house to see if the stairs stop squeaking.
If the stairs don’t stop squeaking in a few months, call the builder to have them fixed. Keep in mind that most home builder warranties expire after the first year.
Older Homes
It’s common for stairs in older homes to start squeaking at some point. Nails, instead of screws, were used to build these stairs. Screws have greater holding power.
Wood stairs in older homes were built with pine, Douglas Fir, and other conventional lumber. Unlike engineered lumber, this lumber will shrink, causing the nails to squeak in the wood.
Fix Squeaky Stairs From the Bottom
If you have access to the underside of the stairs, fix the squeaks from here since any screws or nails that you drive will be hidden.
Fasten the Riser to the Step
The vertical riser rests over the back edge of the step. Driving a nail or screw through the riser and into the back of the step will secure them and prevent them from rubbing.
- Measure step thickness: Measure the thickness of one of the stairs from the top. Most stairs are 1- to 1-1/2 inches thick.
- Mark the step thickness: Transfer the step thickness to the riser. Measure upward from the riser’s bottom, then mark with a pencil.
- Nail into the step: Drill a pilot hole through the riser and into the center of the step. Then, drive a 2-inch, 6d (penny) nail or screw through the hole. Drive three nails per step.
Support the Step With Braces
Add support to the junction between the front of the step and the riser to prevent it from flexing.
- Measure step and riser thickness: Measure the thickness of one of the steps and risers to determine the length of the screws you’ll be using. The screws should be 1/4-inch shorter than the step or riser thickness.
- Position the brace: Place a 2-inch L-shaped metal brace so that one half is against the riser and the other half is against the step.
- Secure the brace: Drive screws through all four of the brace’s holes. Make sure that the brace snugs firmly against both surfaces. Add two or three braces per step.
Fix Squeaky Stairs From the Top
When the bottom of the stairs is inaccessible, you’ll need to fix the squeaks from the top.
Fasten the Step to the Stringer
If the staircase has a center stringer, fasten the step and riser to the stringer with screws.
- Locate the stringer: Use a tape measure to find the horizontal center of the step. Mark a line on the step and riser to indicate the stringer’s position.
- Countersink the screws: Mark two drill points on the step and two on the riser. Place a countersink bit in the drill. Drill shallow depressions (countersinks) at each drill spot so that the screw heads will be level with the surface.
- Drive the screws: First, drive a pilot hole, then drive the screw. Add two screws to a step and two screws to a riser.
Fasten the Step to the Risers
Fastening a squeaky step to the riser behind it is simple from the bottom but more difficult with top access only. It can be done by driving the screw at an angle through the step into the riser.
- Locate the step’s center: Use the tape measure to locate the horizontal center of the step and mark the center with a pencil.
- Drill an angled pilot hole: Drill a pilot hole at an angle from the step to the riser in the back.
- Drive the screw: Drive a screw through the pilot hole. The screw must contact and grab into the riser in the back. If it doesn’t, drill another pilot hole to the side and drive a screw at a lower angle.
DIY vs. Professional Stair Squeak Repair
If you’re a DIYer with intermediate skills, you can fix most stair squeaks—especially if you can access the staircase’s underside.
You may want to call a carpenter if you only have top access to the stairs. Drilling holes and driving screws at low angles (from the step to the riser) is tricky, but most skilled carpenters can do this.
How to Prevent Squeaky Stairs
Tips to lessen the chance of squeaks developing in your stairs:
- Control moisture: Keep the home’s humidity level between 40- and 60 percent. Use either a dehumidifier or a humidifier, if necessary.
- Maintain temperatures: Always keep the home climate-controlled, especially in the winter. Never let the interior approach freezing temperatures.
- Avoid heavy impact: Walk carefully on the stairs and avoid carrying heavy items like demolition debris down them.
- Install stair covers: Stair step or tread covers are primarily meant to freshen up dated stairs. Yet hardwood step covers can help to equalize weight across the width of the step and reduce squeaks.
-
Can you use WD-40 on squeaky stairs?
You cannot use WD-40 on squeaky stairs. Wood is porous, so it quickly absorbs the liquid product if you spray it in nail holes or behind stair steps. Also, WD-40’s oily texture may create a slip hazard on stair steps. While WD-40 has thousands of approved uses, fixing squeaky stairs is not one of those uses.
-
When should I be worried about squeaky floors?
If the floor is tile or stone, you should be worried about squeaky floors. A flexing subfloor will crack hard materials like tile or stone. If the squeak is accompanied by a cracking sound, the floor may be in the early stages of breaking. Generally, though, you don’t need to worry about squeaky floors. The squeaks may be caused by temperature or humidity changes, improperly fastened subfloors, or loose nails.
-
How do you stop floorboards creaking without removing them?
You can fix squeaky floors without removing them by sprinkling a dry lubricant like powdered graphite on the squeaky spot. Place a towel over the spot and step on it several times. For a more permanent fix, drill a pilot hole into the floorboard from above. Place a countersink bit in the drill and drill a shallow depression (a countersink). Drive a screw into the hole. Cover the screw head with wood putty and sand smooth.
Read the full article here
