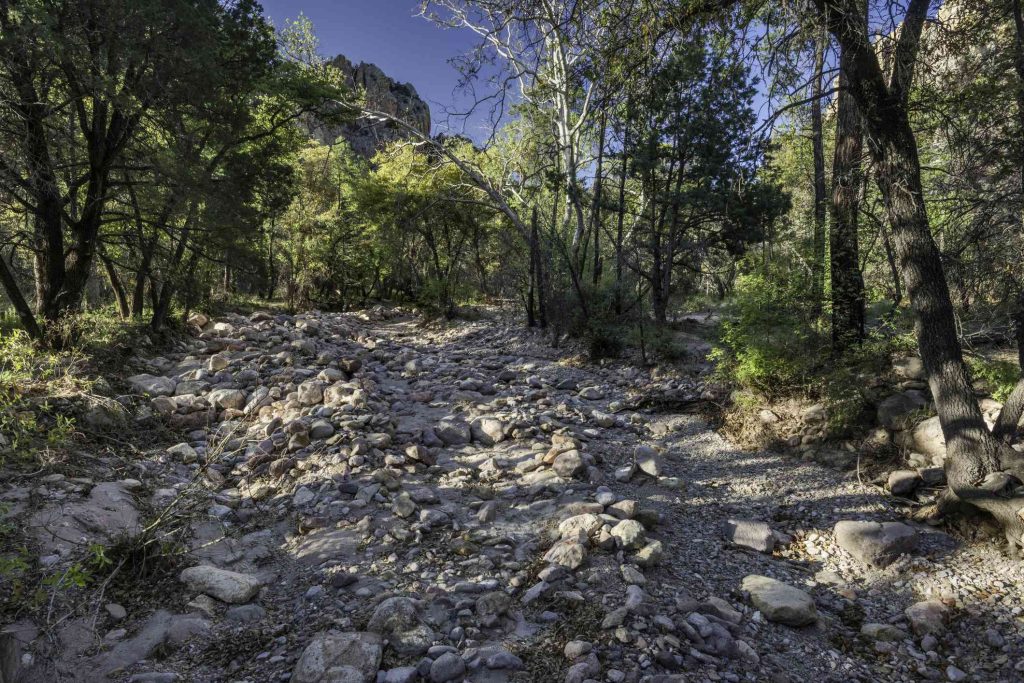
If you have a slope or low spot on your property where excess water flows or collects, you can correct the problem naturally with a dry creek bed. A creek bed, also called an arroyo, is a shallow trench lined with landscape fabric and filled with boulders and stones of various sizes. During wet weather, excess surface water is channeled down the creek bed to a suitable exit or collection point where the water can percolate down into the soil. This helps prevent pools of water in undesired areas, such as near the house or on a neighbor’s property.
A dry creek bed is an effective drainage solution, but it can also be an attractive landscape feature that needs very little maintenance. It’s a form of hardscaping, a non-organic landscape design element. Best of all, you get to decide exactly how it looks, designing the path of the creek and choosing and placing all of the boulders and stones. Once the bed is in place, you can add plants along its edges to enhance the natural look and provide some balance for the hard stone materials.
Codes and Regulations
In many cases, a dry creek bed is not something you need a permit for, but it’s very important to plan the drainage path carefully to direct excess water to an appropriate location. In most areas, it is illegal to send drainage water into the street because it stresses storm sewer systems and can wash lawn treatments and other contaminants into local waterways.
Warning
Before getting started on the project, call 8-1-1, the national “Call Before You Dig” hotline, to have all underground utility lines marked on your property. This is a free service, but it can take a few days, so call well in advance of your start day.
Ideally, a dry creek bed terminates at a natural settling area—well within your property lines—where the water can pool and soak into the soil. If this is not an option, contact your city office for recommendations. You may need to submit plans for your project and gain approval from the appropriate city authority. It’s also important to make sure water isn’t directed toward neighboring properties, or you might be faced with unhappy neighbors, or possibly a lawsuit.
Need more help? Talk to a landscaping expert
Our partners can help you compare quotes from top-rated professionals near you
Get a Quote
What You’ll Need
Equipment / Tools
- 2 garden hoses
- Shovel
- Wheelbarrow
- Tamping tool
- Steel rake
- Utility knife
Materials
- Landscaper’s paint
- 30-year landscape fabric
- Landscape fabric staples (optional)
- Boulders and stones (variety of 2-inch to 18-inch pieces)
- River rock (3/4-inch to 1 1/2-inch pieces)
Instructions
-
Lay Out the Creek Path
Lay out the side edges of the creek bed, using two garden hoses. Curve the path for a more natural look, but keep in mind that water must flow efficiently; don’t include sharp bends or any obstacles that might inhibit water flow. Work with the natural slope and contours of the ground as much as possible, to promote flow. A typical size for a dry creek is 3 feet wide, but you can modify this as needed.
-
Mark the Sides of the Trench
Mark both sides of the creek path with landscaper’s spray paint, following the garden hoses. You can lift up the hose as you go (so you don’t get paint on it) or simply remove the hoses and paint along the impression the hoses left in the grass.
-
Dig the Trench
Remove all grass and other plants between the painted lines. Excavate the soil to a depth of 12 to 18 inches, as desired. You can slope the sides somewhat, to make a concave trench, or you can dig the sides straight down. In any case, the center of the trench should be the deepest point or at least as deep as the sides. Shovel the soil into a wheelbarrow and move it out of the area as you go. Make sure the trench follows a natural downward slope from the top to the bottom of the creek path. Tamp the soil firmly with a hand tamp or by stepping repeatedly with your feet.
-
Add Landscape Fabric
Cover the entire trench with 30-year landscape fabric. Use only high-quality, commercial-grade fabric; do not use plastic or inexpensive weed barrier. Drape the fabric about 12 inches beyond the sides of the trench to ensure full coverage (you will trim the excess later).
If the creek path is relatively straight and narrow, you may be able to run a single swath of fabric lengthwise down the trench. Otherwise, it’s usually better to lay strips of fabric perpendicular to the trench, running them long over the sides. With the latter method, start at the bottom (lower) end of the creek and work toward the top, overlapping the strips by at least 6 inches. If desired, pin the fabric in place with landscape fabric staples, or you can just let the rocks hold it in place.
-
Place the Boulders
Set a few boulders (stones over 10 inches in diameter) along the edges of the creek path, grouping them for a natural and random look. In a real river, larger rocks typically are found along the outsides of river bends; try to mimic this effect for the most natural look. If necessary, lift up the landscape fabric and add or remove soil beneath to help a boulder rest in place.
-
Place the Medium-Size Stones
Place somewhat smaller rocks (about 2 to 6 inches in diameter) around the boulders and in other areas, as desired. As with the boulders, random placement looks more natural than a uniform arrangement. In general, use the medium-size rocks to line the sides of the creek, and perhaps add an occasional rock or small grouping near the center.
-
Add Special Features (Optional)
Place stones to create special features, such as a line of wide, thick stones that cross the creek like stepping stones. Or, you can create a stone bridge by piling some larger stones along the sides and spanning atop them with a broad, flat stone.
-
Fill in With River Rock
Cover the remaining exposed areas of the creek bed bottom with river rock and/or gravel, ranging from about 3/4 inch to 1 1/2 inches in diameter. This layer should be thick enough to completely conceal the landscape fabric. Use a rake to spread and smooth the smaller stones over the center of the bed. By hand, push stones around the boulders for a natural look.
-
Trim the Landscape Fabric
Cut away all excess landscape fabric along the sides of the creek with a utility knife. The fabric should extend under the boulders but should not be visible.
Tips for Building a Dry Creek Bed
After you build your dry creek bed, you can dress up its sides with plants. As always with hardscape features, you can make them look better with plants because the plants will soften the hard look of the stone. Plants can also protect against erosion during heavy rains. Usually the best place to add plants is behind large boulders along the creek edge. Fill in around planted areas with stone or wood mulch. Just make sure the mulch can’t get washed into the creek, where it can clog the stone and create a maintenance problem.
A rain garden is a great option for the end, or collection point, of a creek bed. A basic rain garden is a 6- to 9-inch-deep depression (like a small pond) filled with plants that can tolerate occasional flooding. During heavy rains, water collects in the garden and filters into the ground, usually in a matter of hours. Rain gardens are a natural solution to common drainage and stormwater problems and are recommended by many municipalities. For more information, contact a local extension office.
Read the full article here
