Removing and replacing a toilet is not a task to be undertaken without good
reason, but it is certainly not beyond your capabilities. When you can’t
unclog the toilet by less drastic means, removing it is the answer. Maybe you
want a more modern toilet, maybe the bowl or the tank is cracked, or maybe the
fixture leaks around its base. All of these situations call for removing and
reinstalling the old toilet or installing a new fixture.
Although there’s nothing difficult about removing and replacing a toilet,
local plumbing code may prohibit anyone but a licensed plumber from doing the
job. Check the code for your community to make sure it is okay for you to undertake
the task. To replace a toilet:
Step 1: Measure the rough-in distance—the distance from the wall behind
the bowl to the center of the toilet floor drain. Measure from the wall to the
center of either of the two hold-down bolts, one on each side of the toilet,
that hold the fixture to the floor. If there are two bolts on each side, measure
to the center of the rear bolt.
Step 2: Select the replacement toilet unit using the rough-in distance so that
it will fit properly in your bathroom. You can replace your old toilet with
a more modern fixture, but you must make sure that the new unit will fit into
the space between the drainpipe and the wall. You can install a smaller unit,
but you cannot put a larger toilet into a space that was occupied by a smaller
fixture.
Step 3: Shut off the water supply to the toilet tank, then remove all the water
from both the tank and the bowl. Trip the flush handle to eliminate most of
the water from the tank. Then soak up whatever water is left with a sponge.
Bail out the water in the bowl with a small container, and then use a sponge
to dry out the bowl completely.
Step 4: If the tank is connected to the wall, remove the hanger bolts inside
the tank that secure the tank to the wall. Then remove the pair of bolts at
the bottom of the tank that connect the tank to the bowl. Remove the tank and
set it out of the way.
Step 5: Remove the caps over the hold-down bolts at the base of the bowl if
there any. Most of these caps are made of ceramic to match the bowl. Some types
are held on by plumbers’ join compound and can be pried off with a putty
knife; others are threaded and can be unscrewed. After removing the caps, brush
away the dried compound before proceeding.
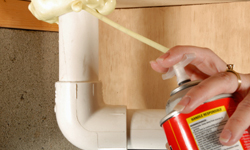
Step 6: Remove the hold-down nuts or bolts. These may be extremely stubborn,
but some penetrating oil should make removal much easier. Save the washers and
bolts if you will be reinstalling the bowl. Once the hold-down nuts or bolts
are out, there’s nothing else holding the bowl to the floor. Caution:
To prevent sewer gas from backing up the drain, you should plug the opening
while you work. Tie a cord around an old towel so it won’t fall through
the opening, and jam this plug into the drain.
Step 7: Remove the bowl. Because the bowl and the tank can crack from just
one sharp blow to the porcelain, spread out an old piece of carpeting on which
you can lay the fixtures. You should also have a bucket and sponge handy to
soak up the water you couldn’t bail out earlier. With your work surface
prepared, rock the bowl gently back and forth to loosen it, and then lift it
straight up. It weights about 60 or 70 pounds. Set the bowl on the piece of
carpeting.
Step 8: Inspect the uncovered drain. If necessary, clear the drain. Once the
pipe is clear, you can proceed with the replacement of the toilet.
Step 9: Putting in a new toilet and reinstalling the old one are done in the
same way. With a putty knife, scrape away all the old putty or other sealing
material from both the bottom of the bowl and the floor flange.
Typical installing of a two-piece floor-mounted toilet.
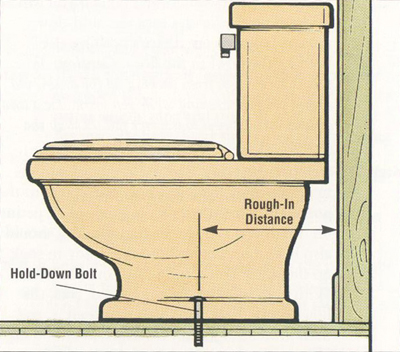
The rough-in distance can be measured with the toilet in place by measuring
from the wall to the center of the hold-down bolt, or to the center of the rear
bolt if the fixture is held by two pairs of bolts.
Inspect the floor where the toilet was. If the floor has rotted, it will have
to be rebuilt before the toilet can be installed. Depending on how bad the damage
is, the rebuilding may involve the floor, the subfloor, and even the joists.
In this case, have a carpenter rebuilt the damaged area before you install the
toilet. Also inspect the flange and the bolts that come up from the flange.
If the flange is damaged or the bolts are stripped, replace the faulty part
of parts before you go any further.
Step 10: Install a new sealer ring on the water outlet opening on the bottom
of the new bowl. With the fixture upside down, set the sealer ring into place
on the bottom of the bowl. If the floor flange is recessed, you’ll need
a gasket with a plastic sleeve in the ring. This sleeve should face toward you
as you position it, since it will go into the soil pipe.
Step 11: Apply a uniform layer of the toilet-bowl setting compound about 2
1/8 inch thick around the edge of the bowl at the base. This compound is available
at hardware stores and plumbing-supply stores.
Step 12: Remove the plug from the drain or soil pipe. Turn the bowl right side
up and place it down over the flange, guiding the bolts into place. Press down
firmly, and give the bowl a slight twist to make sure the wax ring seats properly
against the flange. Place a level across the bowl to make sure that it is level.
Move the bowl as needed to level it, but don’t disturb or break the seal
of the wax ring or the toilet will leak.
Step 13: Hand-tighten the nuts to hold the bowl to the floor. Do not over-tighten
the nuts, or else the fixture may crack. Coat the hold-down nuts and bolts with
toilet bowl setting compound and reinstall the caps.
Step 14: If the tank and bowl are separate fixtures, you should now attach
the tank. Rebolt a wall-mounted tank, or reinstall the bolts and washers that
connect a bowl-supported tank. Replace any damaged parts. If the tank and bowl
are connected with spud pipe, apply pipe joint compound to the threads of the
spud slip nuts and tighten them in place.
Step 15: Reconnect the water supply inlet pipe to the tan, make sure the ballcock
assembly is properly attached, and turn the water back on.
Read the full article here


